 Once you have recorded a lecture with a single camera you will need to edit the video so it looks like there were several cameras at the event. When you get back to the edit booth you should have a continuous recording of the lecture from a position directly in front of the speaker. Most of this video should be either medium shots or medium close ups of the speaker. In other words you should be able to clearly see the speakers face.
Ideally you should have two audio channels recorded. One from the house public address system and one from a microphone you put on the speaker. Choose the audio that sounds best on the video. Often times audio that is recorded from a podium microphone will sound echo-y and if the speaker paces the audio may not be consistent.
I am assuming you will be editing on a non-linear editing system although the principals are the same with a linier editing system but the techniques are a little different. For this type of editing you do not need anything fancy and you do not need any special effects. You should use an editing system that will allow you to separate the audio and video tracts, add titles and insert graphics or still pictures over the video.
First take the main recording of the lecture and add the entire video and audio clip to the timeline. Trim the extra video off the beginning and the end so there is just the lecture. Then scan the lecture and cut out anything that should not be part of the lecture. This can be mistakes, interruptions, or anything that interferes with the flow of the lecture. Do not worry about jump cuts, you can cover them up later.
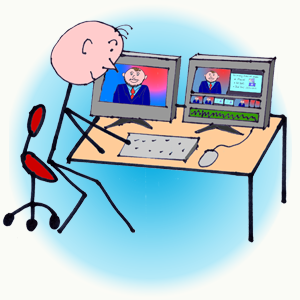
Now if you have the slides saved in a program such as PowerPoint convert the slides into a format that your editing system will accept. For example, I use the Adobe Premier editing system and it will easily import jpeg files. In Microsoft’s PowerPoint program you can save the slides in the jpeg format and they will be ready to import. Now go through the lecture and drop in the jpeg or image files in the appropriate spot on the timeline. Adjust the length of the slide images to correspond to when the speaker is referring to the slides. If you have the slide recorded on video simply take the video and insert them into the time line. Since the images are still you can adjust the length of the clips to the right length. Remember do not sync these images to the audio track. You should be able to move them where you want without changing the audio.
Now look at the main recording again. Are there any sections where you need to cover up a shaky camera, an edit or a jump cut? If one of the slide images can easily be moved or extended to cover it up do it. Next, look at the audience cut-a-ways, wide shots and reverse shots and use them to cover the bad places in the video.
Now look at the entire lecture again. Are there long sections where there is just the single camera from the front? Use a variety of the cut-a-ways, wide shots and reverse shots to break up the monotony. You can mix these shots up a bit but there are some general rules common to all television and film that can be jarring at times if they are not followed. Generally shots go from wide, medium to close up. So in a lecture a good shot to open with is a wide shot that includes the stage, perhaps some of the audience and even the projection screen. This gives the viewer the immediate information that this is a lecture and what the room is like. Remember the viewer is not there and the wide shot puts things in perspective. Usually going into a close up from a wide shot is too jarring, especially at first. It is best to go to an medium shot then to a close up. After the room has been established it is easier to cut back and forth from wide shots, slides, cut-a-way shots of the audience and the speaker.
Another convention of film and video editing is that if you put in a shot of the audience watching something it is assumed that the next thing on the screen is what they were looking at. This is one of the reasons that in the blog on how to shoot the lecture we say to take all the shots from one side of the lecture hall. For example if you take a shot of the speaker from the right side of the lecture hall then cross over to the left side and take a shot of the audience you will have crossed the line of action. This subject is an entire blog in itself bur for now let me assure you that if you edit these two shots together it will look as if the speaker and the audience were looking in the same direction. Try it and see.
Now put on the open and close for the program. Depending upon your organization or the purpose of the video the open and close may be elaborate or they may be simple. Even simple is better than nothing at all. Just starting in the lecture or abruptly ending looks amateurish and you are missing an excellent opportunity to brand your organization, or cause and to give the viewing valuable contact and subject information.
Promote the speaker, the organization, sponsors, the event and the subject by putting lower 3rd keys on the video. Don’t cover up slides or important graphics but put the keys in anyplace where there is just the speaker. People are used to title keys from watching television and you can use them to promote what you are doing. Make the titles big and clear enough so they can be read when you stream the video on-line.
Video transitions will be covered in more detail in another blog but here are some basic rules. The opening of the program should fade up from black to the opening titles. The opening titles should dissolve to the main program. After that you should only use cuts. If you are covering up a bad edit and you are showing a cut-a-way to the audience you should use a cut. Here’s a hint, they are called cut-a-ways. When you go to the slides cut to the slides and cut back to the speaker. The only exception is you may opt to dissolve to a moving video although a cut to the video is fine. At the end of the program you can dissolve to the credits then fade to black at the end. If you use a lot of dissolves and wipes in the body of the recorded lecture you might as well sew a scarlet A for amateur on your jacket. Watch a news show or a movie to see how they do it.
The length of most lectures is going to be longer than what I usually advise for video online. Short, to the point lectures are great for on line distribution but the nature of most lectures usually demands a longer format. Try to stay shorter whenever possible. Watching any lecture over an hour will try the most interested viewer. Shorter lengths will make the lecture more acceptable for classroom, work and even broadcast use. If you can make it shorter do it.
Now you are ready to put your program online. For more about recording a lecture with one camera you can download the free video: Recording the One Camera Lecture now.